

- Jill
Questions
0
Answers
121
-
若要使用 Mold Design Discovery,需滿足以下條件才能產出預測報告:
1. 相同材料的模型專案數量超過 20 筆
2. 相同材料的模型相似度高於 70%
3. 具有澆口數量
4. 具有最大射出壓力值
另外,當導入體積 ± 20% 未找到專案時,系統將擴增至 ± 30%的進階搜尋條件來找出符合專案
- 284 views
- 1 answers
- 0 votes
-
若出現此現象,請先確認螢幕解析度設定。
當螢幕解析度較低時,iSLM 可能會誤判使用者的裝置為平板,進而自動隱藏設定功能,導致使用者無法看到 System Setting。
您可以嘗試縮小瀏覽器的檢視比例。
以 Chrome 為例,縮放功能位於右上角的選單中: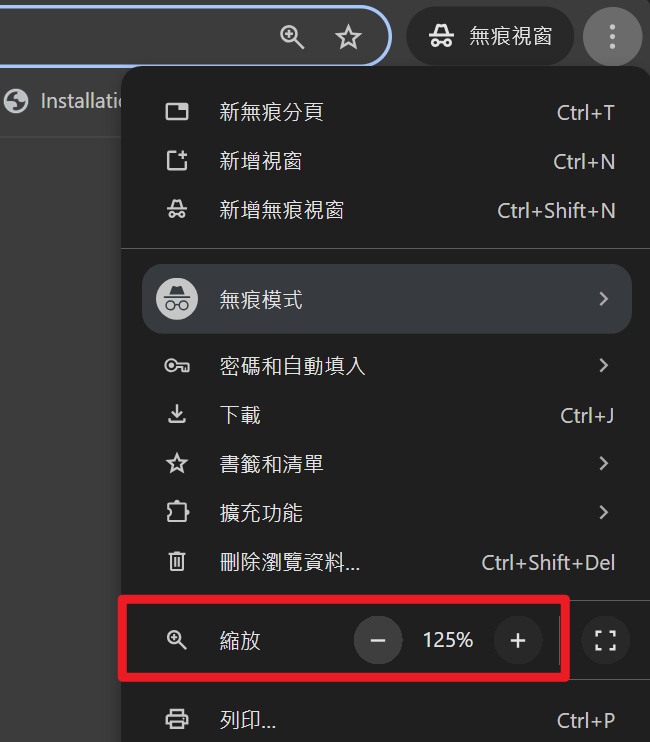
建議將瀏覽器視窗的寬度調整為 1600 像素以上,即可正常顯示並使用 System Setting。
- 381 views
- 1 answers
- 0 votes
-
當發生 iSLM 解除安裝失敗的狀況時,請執行以下操作步驟以排除問題:
1. 檢查檔案殘留狀況
- 於 Windows Menu 查詢 “regedit” 並啟動
- 機碼:
ᅳ Computer\HKEY_LOCAL_MACHINE\SOFTWARE\CoreTechSystem\Moldex3D iSLM
- 取得 INSTALLDIR 路徑

- 確認 INSTALLDIR 所取得的路徑中,檔案基本上都已清除 (若僅剩下 data、runtime 等資料夾可忽略)
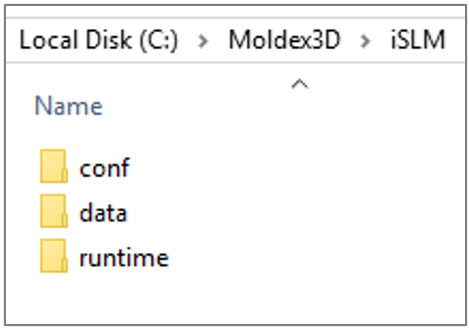
- 若有殘留檔案,可完全清除 data 資料夾以外的所有檔案
2. 清除機碼
- 於 Windows Menu 查詢 “regedit” 並啟動
- 機碼:
ᅳ Computer\HKEY_LOCAL_MACHINE\SOFTWARE\WOW6432Node\Microsoft\Windows\CurrentVersion\Uninstall\{AA99BDA9-CE81-4812-8C7A-C841EB808D42}
ᅳ Computer\HKEY_LOCAL_MACHINE\SOFTWARE\WOW6432Node\Microsoft\Windows\CurrentVersion\Uninstall\InstallShield_{AA99BDA9-CE81-4812-8C7A-C841EB808D42}
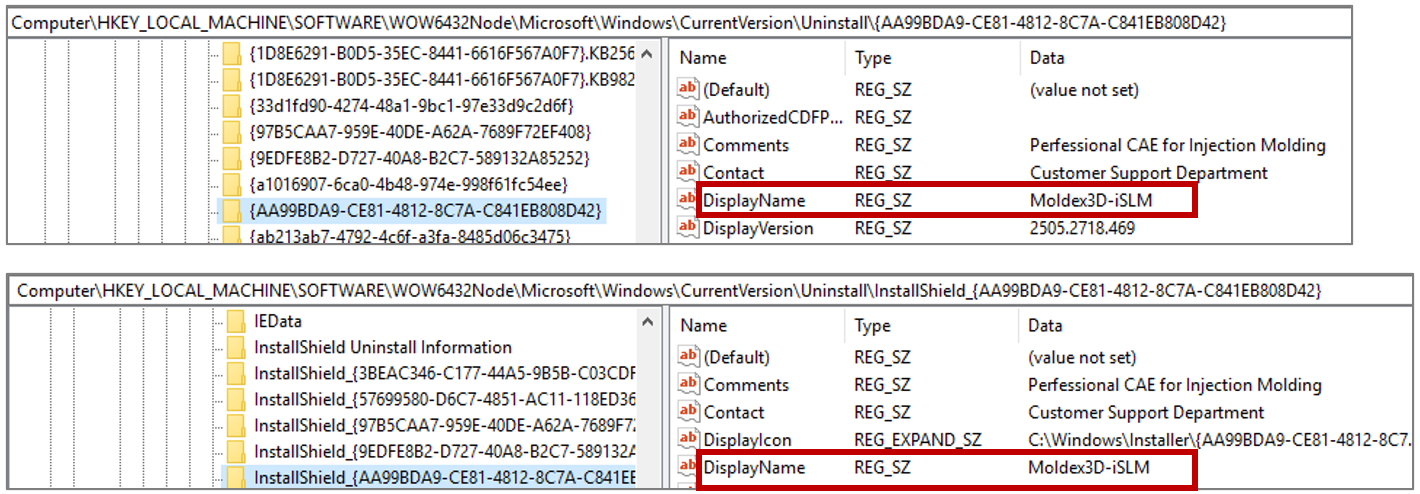
- 確認 DisplayName 皆為 “Moldex3D-iSLM” 並移除
3. 清除 Windows Installer (MSI) 殘留資訊
- 方法一
ᅳ 使用使用 管理員身分 執行 cmd 指令: msiexec /x {AA99BDA9-CE81-4812-8C7A-C841EB808D42} /qn

- 方法二
ᅳ 使用使用 管理員身分 執行 Power Shell 指令: (Get-WmiObject -Class Win32_Product | Where-Object { $_.IdentifyingNumber -eq ‘ {AA99BDA9-CE81-4812-8C7A-C841EB808D42}’ }).Uninstall()

4. 清除完成後即可重新開始安裝
- 471 views
- 1 answers
- 0 votes
-
Possible causes of this issue include the following:
1. Registry with invalid characters
2. Installation and configuration of the Ruby library (related to permissions)
- bundle-install.bat
3. Other issues
- Permission related of Script execution
- Inter-Process Communication (IPC) related
- Consider improving support procedures
*Here are solutions:
1. For CADdoctor 2024 R2 users
- Launch bundle_install.bat
- Update CADdoctor 2024 to R4 or later
2. If still not resolved, launch “ShowCADdoctorLogFile.bat” to export debug file
Solution 1:
1. For CADdoctor 2024 R2 users -> launch bundle_install.bat
- Run cmd as Administrator and do the following four steps
– Make sure the folder goes to installation folder (Default is C) by typing in C:
– Point the folder to CADdoctor Tool by typing in cd C:\Moldex3D\2024\CADdoctor\e3ds\SmartLauncher\tools
– Type in set ELY_RUBIES_BASE=%ProgramData%\CoreTechSystem\Ruby
– Type in bundle-install.bat
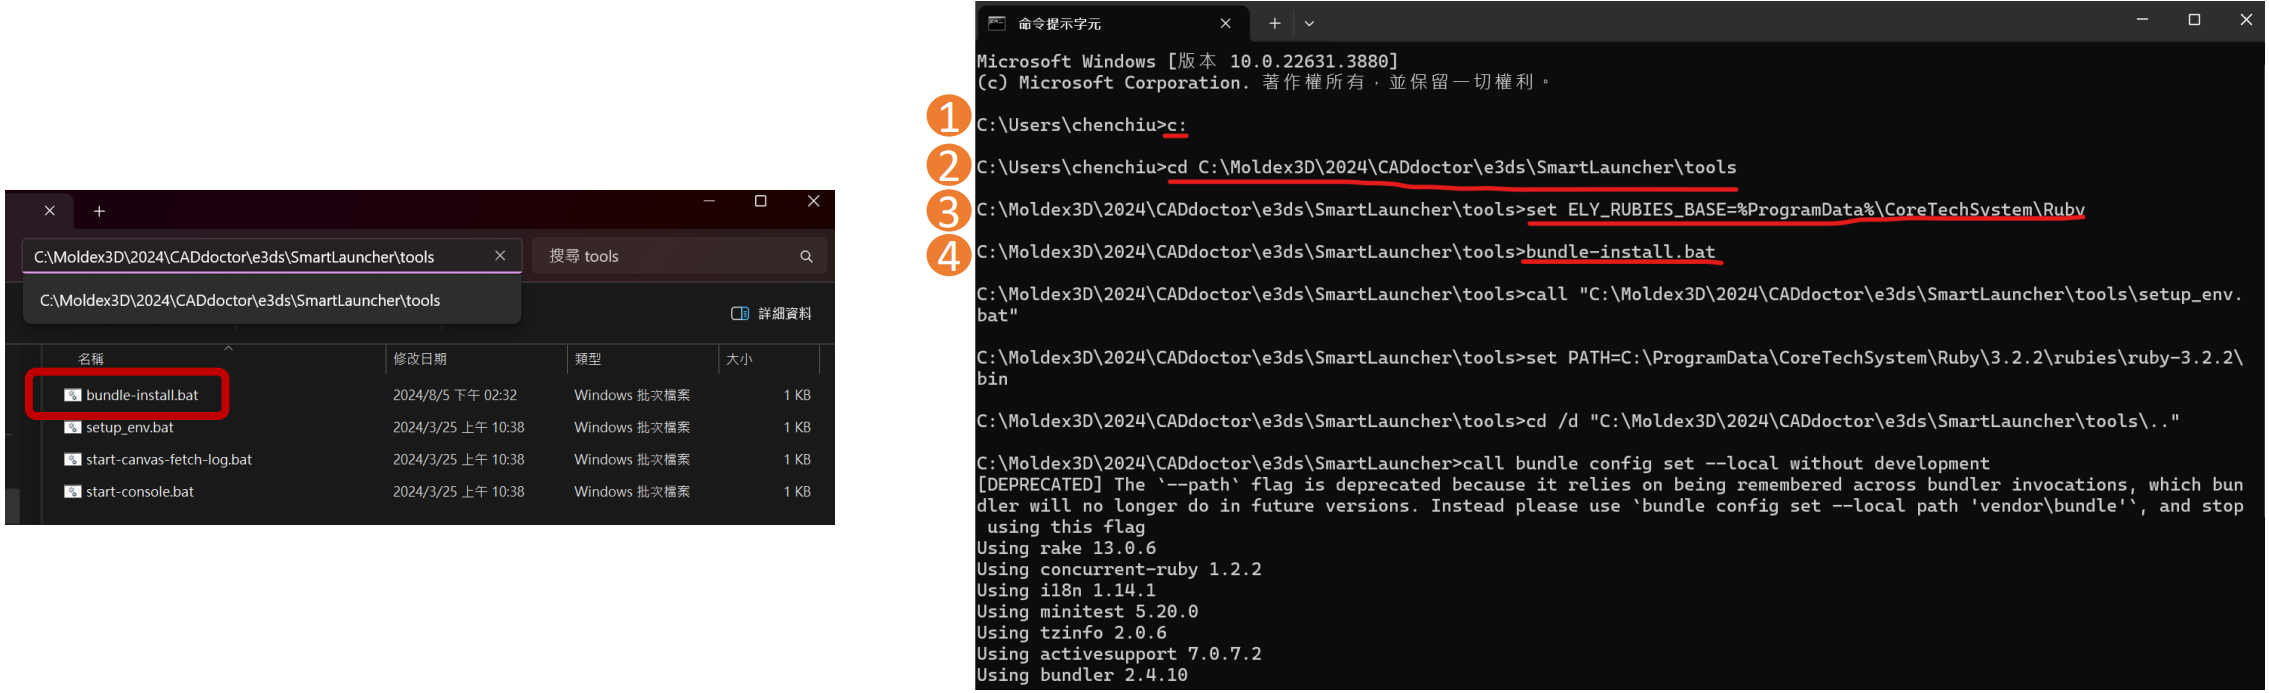
- If the cmd returns the following information indicating the installation failed, you can try the following steps to see if they resolve the issue.
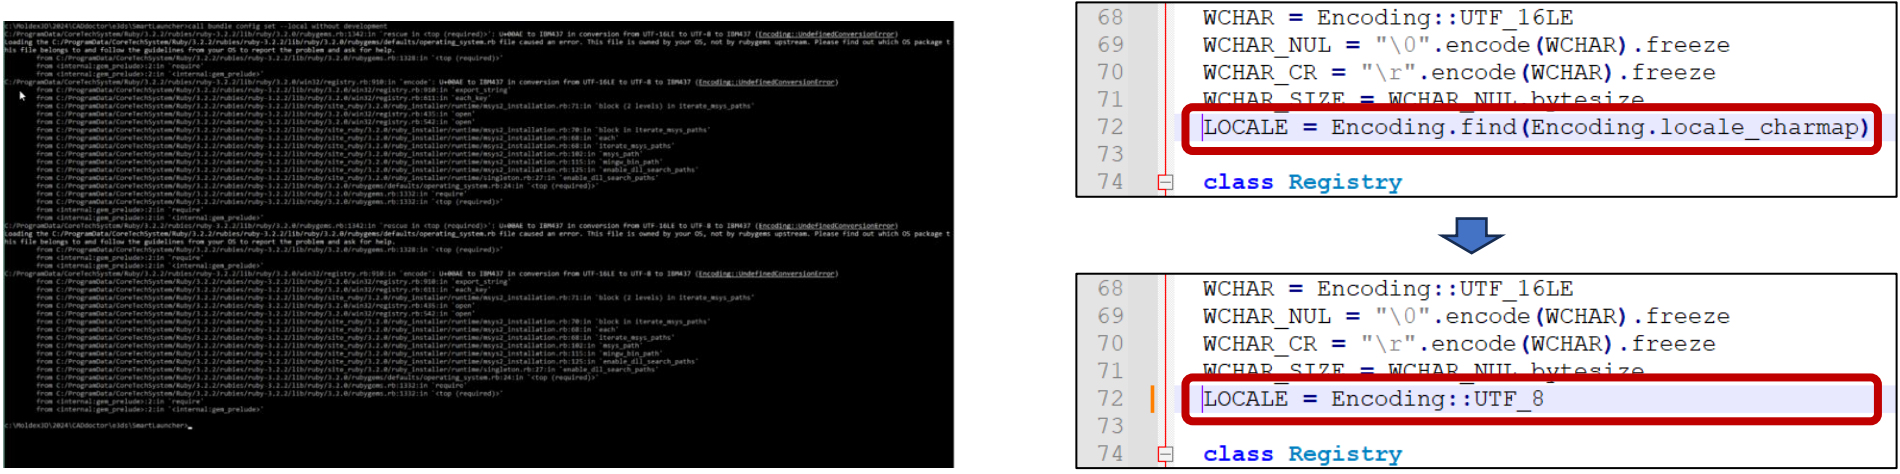
– Open in text editor\ and modify ruby registry.rb file
1. C:/ProgramData/CoreTechSystem/Ruby/2.7.6/rubies/ruby-2.7.6/lib/ruby/2.7.0/win32/registry.rb
By editing line 72 of the above file as follows, it may be possible to avoid the issue.2. Before) LOCALE = Encoding.find(Encoding.locale_charmap)
After) LOCALE = Encoding::UTF_8– Redo the progress in the last page
2. For CADdoctor 2024 R2 users -> Update CADdoctor to 2024 R4 and later
- Supported by Moldex3D CADdoctor for 2024R4/2025R0
– Registry with invalid characters
– Installation and configuration of the Ruby library (related to permissions)
» bundle-install.bat
Solution 2:
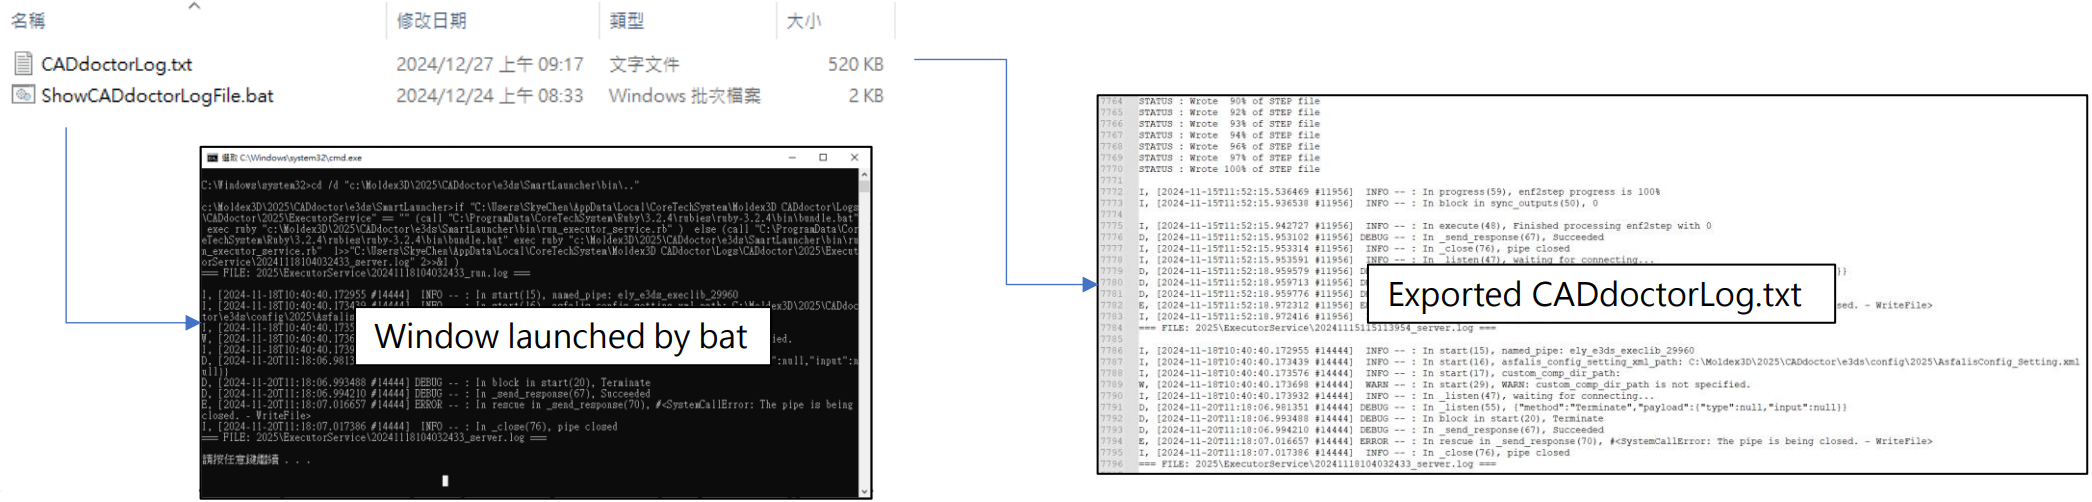
1. Launch “ShowCADdoctorLogFile.bat” to export debug file
- Goal: Collecting log files related to other issue
– Permission Issues for Script Execution
– Inter-Process Communication (IPC) Issues
– Other Potential Issues
- Executes the batch file on the affected machine
– batch file from internet can be block
» Batch files obtained from the network, or the internet may be blocked from execution by Windows security features. In such cases, depending on the environment, right-click the file, open “Properties”, and select “Unblock” might resolve the issue
– No need administrator permission to launch
» Administrator privileges are not required, however, depending on the environment, batch file execution may be restricted, in those cases, consulting with the IT department might be required.
- Check error information in Command prompt (CMD)
– If error contain “Execution is prohibited by domain policy”, it was blocked during launching and may need administrator permission or support from IT team on customer side
» Customers are expected to identify obvious errors within the displayed log entries. If a message such as “Execution is prohibited by domain policy” is displayed, the customer should confirm with their administrator.
- Ask customer to send back information exported by “CADdoctorLog.txt”
– “CADdoctorLog.txt” will be created under “ShowCADdoctorLogFile.bat”
- 554 views
- 1 answers
- 0 votes
-
iSLM 除了 Gateway 服務外,其他服務皆使用動態 Port,過去曾因 Port 被佔用導致服務無法啟動且難以除錯,因此單純說明固定 Port 並不準確。
iSLM Gateway 預設使用 80 Port,啟用 TLS 連線時則改用 443 Port。其他服務(位於 server、service 資料夾中)理論上允許本機 IP 連線,目前尚未遇過無法本機連線的狀況,但仍可能被防毒軟體阻擋。防火牆可設定允許特定檔案通過,但是否能繞過防毒軟體則不確定。資料庫連線部分固定使用 27017 Port(MongoDB 預設 Port),該連線也可能因防毒軟體而失敗,因為部分軟體認為直接用 IP 連線資料庫存在安全風險。
建議的解決方案包括:
- 允許防毒軟體放行 Server 的本機 IP 與 27017 Port,並於外部防火牆做額外阻擋設定。
- 修改資料庫設定檔(yaml)中的 bindIp 為 0.0.0.0,並改為由 iSLM 使用 localhost 連線資料庫。
- 382 views
- 1 answers
- 0 votes
-
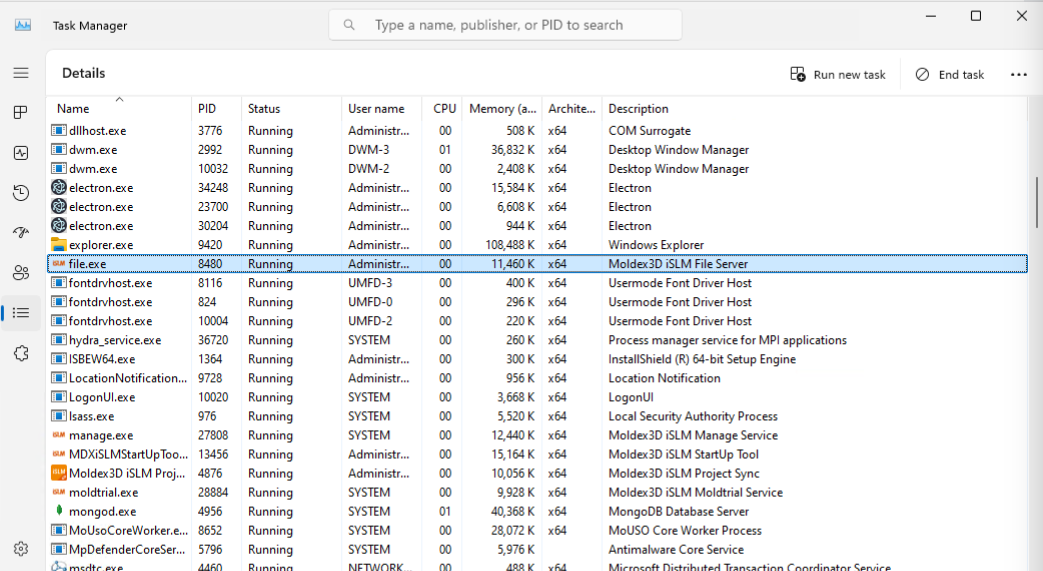
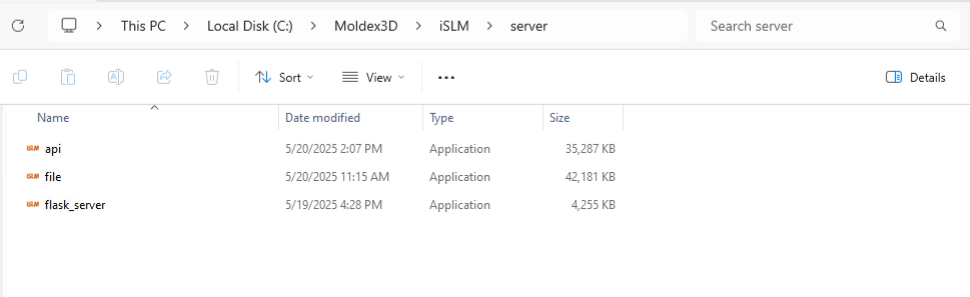
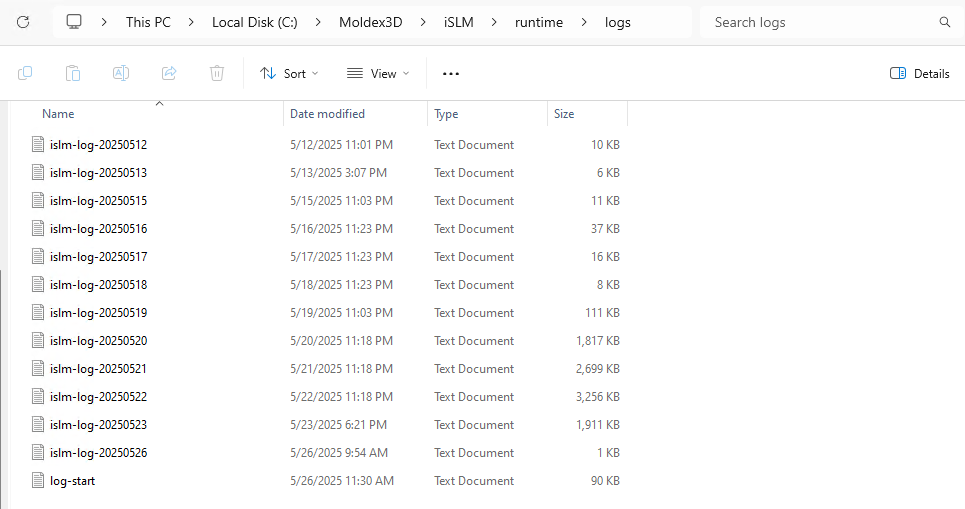
若發生此問題,請先開啟安裝 iSLM 的伺服器電腦,並於工作管理員中確認
file.exe是否正常執行。當電腦處於登出狀態時,該程式可能會被強制關閉,進而導致檔案上傳功能異常。若發現file.exe未啟動,可至 iSLM 安裝目錄下的server資料夾中手動啟動該程式。
另外,當近期站台有新增 HTTPS 設定時,請確認 Server 電腦的 8001 Port 是否正常運作。可於安裝 iSLM 的電腦上開啟任意瀏覽器,並於網址列輸入
$IP:8001/Version進行測試。若網頁顯示ERR或無回應,表示 8001 Port 異常,需檢查並開通該電腦的 8001 Port,以嘗試修復此問題。若網頁回傳
{"message":"1.0"},則代表 File Server 運作正常。此時,請進一步查看 iSLM 的 runtime Log,以確認問題發生的具體原因。Log 檔案可於安裝目錄下的runtime\logs資料夾中找到。
- 341 views
- 1 answers
- 0 votes
-
If you encounter “Connection Failed” errors when using iSLM, please provide a screenshot of the error message for further investigation.
Additionally, if you see the message “Failed to fetch data. Please try again later.” on any page, it may be caused by network latency, which can prevent some APIs from fully loading. Please try refreshing the page to resolve the issue. If the error persists after multiple refresh attempts, please contact the IT department to check whether the iSLM server is functioning properly.
- 495 views
- 1 answers
- 0 votes
-
When the iSLM License expires, only the Administrator can log in to iSLM; other users will be unable to access the system. In terms of functionality, all features under System Settings will remain operational. However, the Solutions and Mold Tryout management functions will be limited to viewing existing project data only—uploading, editing, or deleting data will not be possible. Additionally, the Project Sync feature will be hidden and unavailable.
- 540 views
- 1 answers
- 0 votes
-
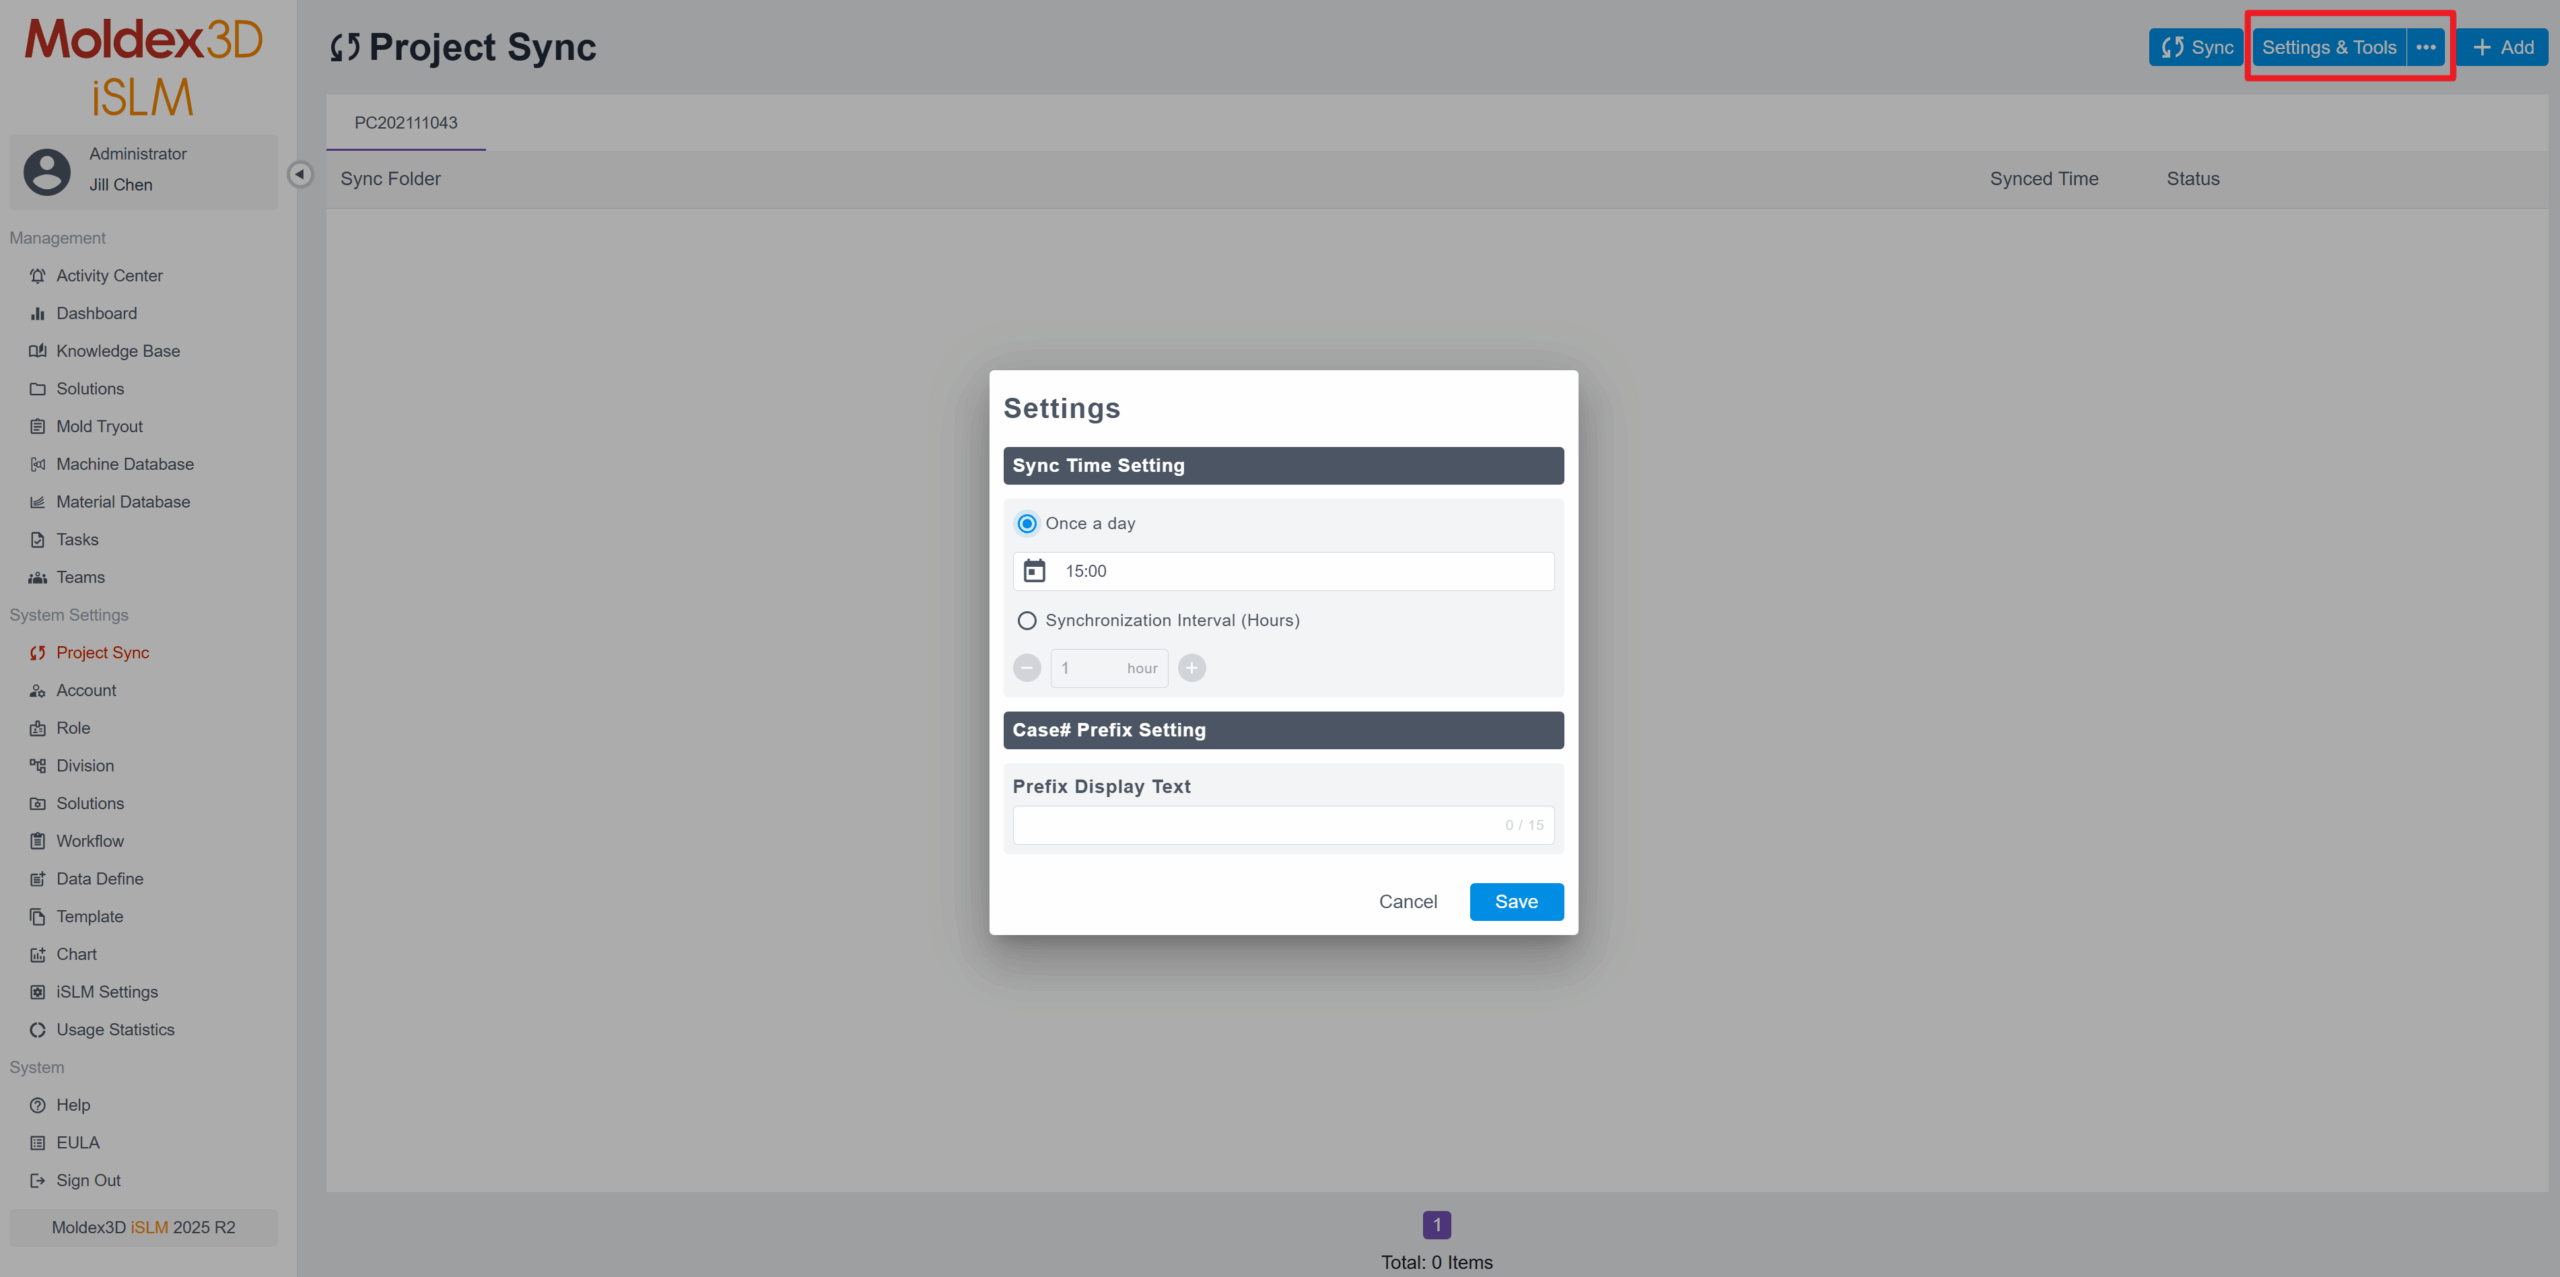
Currently, for projects bound with the Project Sync feature, you can customize the upload and download schedule, as well as set the frequency for uploads or downloads. However, please note that if a project is uploaded manually, the automatic scheduling feature is not supported.
After you bind a project for synchronization through the iSLM Project Sync program, you can go to the Project Sync page and click Settings & Tools > Settings. In the Sync Time Setting section, you can configure the project to upload or download at specific times of the day, or set it to occur at regular hourly intervals.
*For more information, please refer to section “5.1 Project Sync” in the iSLM Help documentation.
This answer accepted by Harley. on 21 5 月, 2025 Earned 0 points.
- 546 views
- 1 answers
- 0 votes
-
若遇到此問題請更新 iSLM 憑證,以下為更新步驟說明:
– iSLM 及 iSLM-DB 更新步驟:
- 關閉 iSLM 及 iSLM-DB 所有服務
- 下載 iSLM Private Key 附件更新檔案
- 將其中的 data.dat 更新到 iSLM 安裝目錄的 data 資料夾
– 預設安裝目錄為:C:\Moldex3D\iSLM\data
- 將其中的 islm-root-ca.crt、islm-mongodb.pem 更新到 iSLM-DB 安裝目錄的 certs 資料夾
– 預設安裝目錄為:C:\Moldex3D\iSLM-DB\certs
- 重啟 iSLM 及 iSLM-DB 的所有服務
– iSLM Agent 更新步驟(如有安裝時才需更新)
- 關閉 iSLM Agent 服務
- 將其中的 data.dat 更新到 iSLM Agent 安裝目錄的 data 資料夾
– 預設安裝目錄為:C:\Moldex3D\Remote Client\data
- 重新啟動 iSLM Agent 服務
* 當初次安裝 iSLM 時,需額外進行以下設定:
- 打開 iSLM-DB 安裝目錄,進入 tools 資料夾,以系統管理員身份執行 CreateAccount.exe 程式
- 啟動 Moldex3D iSLM Database Server
– 可以在「開始」選單中找到該應用程式
– 也可以透過工作管理員手動啟動該服務
- 打開 iSLM 安裝目錄,進入 tools 資料夾,以系統管理員身份執行 default_db.exe 程式
- 嘗試啟動所有 iSLM 服務
- 642 views
- 2 answers
- 0 votes


