

- Jill
Questions
0
Answers
121
-
If the RC Server IP address was incorrectly configured during the installation of the Remote Client Agent, there is no need to reinstall the program. You can adjust it by manually editing the configuration file.
Please follow these steps:
-
Go to the installation directory of the Remote Client Agent.
-
Open the
conf\machine.iniconfiguration file (you can edit it with Notepad). -
Locate the
Hostparameter and modify it to the correct RC Server IP or hostname. -
Save the file and restart the Remote Client Agent service for the changes to take effect.
- 146 views
- 1 answers
- 0 votes
-
-
After installing both Moldex3D and iSLM Personal Mode using the Moldex3D installation package, if you find that analysis transmissions always fail when enabling the Moldex3D Remote Client Agent (RC Agent) and the RC Server is not installed on the same computer, this is usually because the Agent’s default connection settings do not correctly point to the actual RC Server.
In this case, you need to manually adjust the Remote Client Agent’s connection settings so that it correctly connects to the remote RC Server.
Please follow these steps:
First, go to the installation directory of the Remote Client and locate the configuration file:conf\machine.ini
Since the current installation process does not provide a graphical interface to directly set the RC Server connection information, you must open the file with a text editor and manually modify the settings.
Confirm and modify the following item:
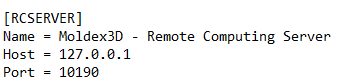
- Host Setting
Change theHostto the hostname or IP address of the actual RC Server (i.e., the hostname of the RCSERVER).

After completing the modifications, please save the
machine.inifile and restart the Remote Client Agent or the relevant service, then try sending the analysis again.- 130 views
- 1 answers
- 0 votes
- Host Setting
-
If you are currently using an HTTPS connection and the iSLM URL or IP address has been changed, the Remote Client Agent must update its configuration accordingly in order to reconnect successfully and continue using related features.
Since there is currently no graphical user interface available to directly modify the connection settings, you will need to manually edit the Remote Client configuration file. Please follow the steps below:
-
Navigate to the installation directory of the Remote Client.
-
Open the configuration file:
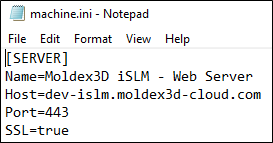
conf\machine.ini -
Modify the following parameters:
- Host:Update this to the new iSLM domain name (it is recommended to use the domain name rather than entering the IP address directly).
- Port:If using a TLS/SSL (HTTPS) connection, the default port is 443. If the iSLM Gateway is not using port 443, please enter the corresponding port number based on the actual Gateway configuration.
- Add or verify the following setting:SSL=true
After completing the modifications, please restart the Remote Client Agent to apply the settings.
- 145 views
- 1 answers
- 0 votes
-
-
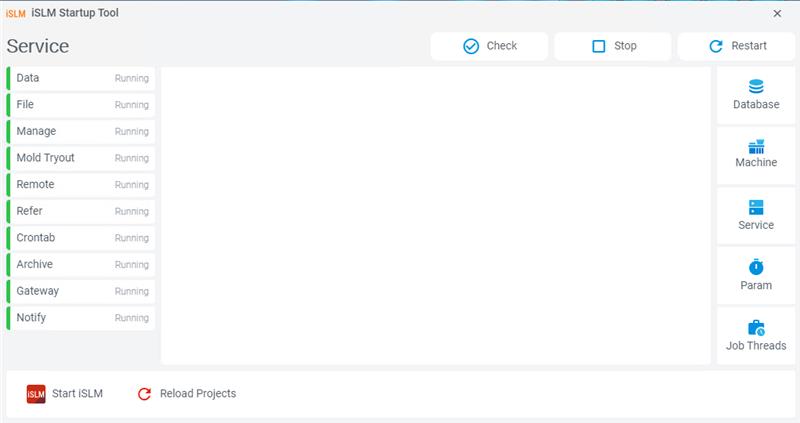
Yes. To prevent system overload caused by uploading or syncing too many projects at the same time, you can limit the number of simultaneous tasks through the Job Threads in the iSLM Startup Tool. You may adjust the number of concurrent uploads or downloads according to your hardware specifications.
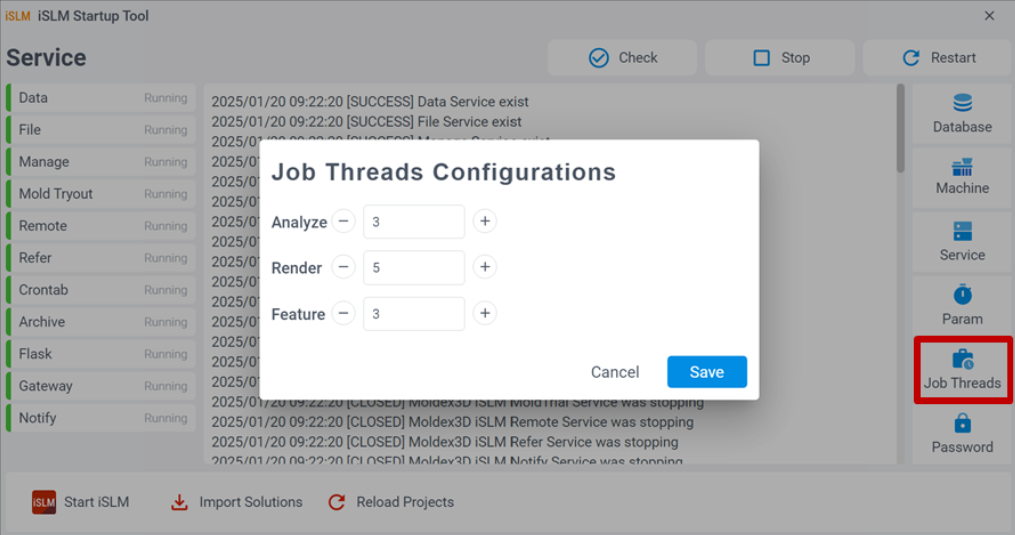
The settings include:
• Analyze
This controls how many Moldex3D projects (including uploads and workflow creation) can be downloaded and analyzed simultaneously.
Large mesh projects consume significant memory, so if your system has limited RAM, it is recommended to set this value to 1.
The default value is 3, while iSLM – Personal Mode defaults to 1.• Render Mesh
This defines the number of CAD-to-mesh rendering tasks that can run concurrently.
Currently, it is used only when generating runner meshes in the iSLM–IC version.
The default value is 5, and Personal Mode defaults to 1.• Feature
This controls the number of files processed simultaneously for similarity search (including CAD files and meshed part files).
For systems with limited CPU or memory, the default value is recommended; on higher-spec systems, you may increase this value.
The default value is 3, and Personal Mode defaults to 1.- 158 views
- 1 answers
- 0 votes
-
1.iSLM Sartup Tool 的 Reload Project 用途為何?
「Reload Project」的主要用途是在 更新 iSLM 版本後,重新解析既有專案的資料,讓舊專案能正確套用新版的功能與設定,確保專案資訊的兼容性與完整性。
2.視窗裡有一個 Thread 的設定,請問這個要怎麼使用?
「Threads」代表系統在執行 Reload Project 時,可分配的 CPU 執行緒數量。
-
如果你的電腦有 多核心/多執行緒(如 8 threads、16 threads…),且目前仍有較多閒置資源,就可以 適度增加 Threads 數值
→ 可以加快 Reload Project 的解析速度。 -
若電腦運算資源有限或同時在跑其他程式,建議不要調太高
→ 避免造成系統負載過高。
- 140 views
- 1 answers
- 0 votes
-
-
您可以開啟 iSLM Project Sync 應用程式,系統會在其中顯示「待處理的專案總數」與「已完成同步的專案數量」,以協助您查看目前的同步進度。
- 166 views
- 1 answers
- 0 votes
-
可能發生此狀況的原因是電腦記憶體不足,且專案網格過大,在解析過程中佔用了過多系統資源,導致資料庫(DB)無法正常運作。
為解決此問題,請先開啟 iSLM Startup Tool,點擊 Job Threads,將所有數值調整為「1」,再嘗試重新啟動服務。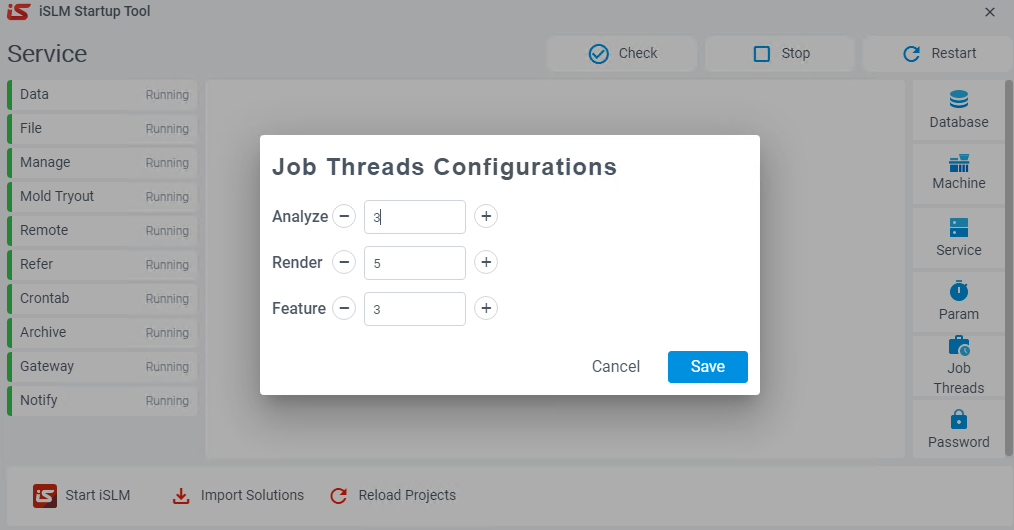
- 143 views
- 1 answers
- 0 votes
-
如遇到此問題,請重新下載安裝包,並同時更新或下載正確的解壓縮工具,以確保所有檔案皆能正確解壓。
- 170 views
- 1 answers
- 0 votes
-
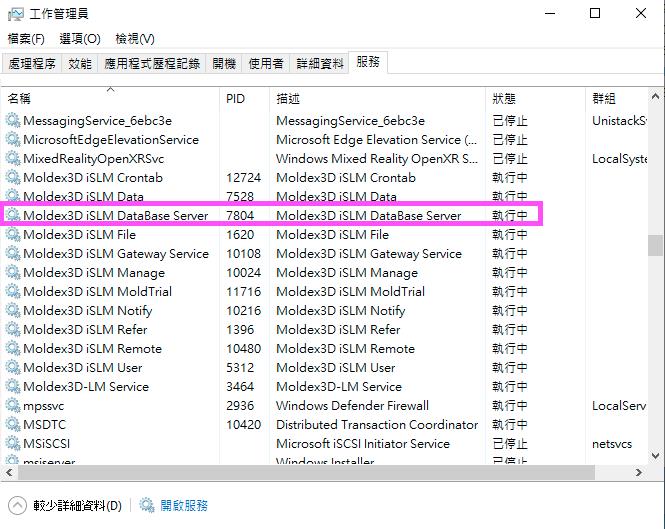
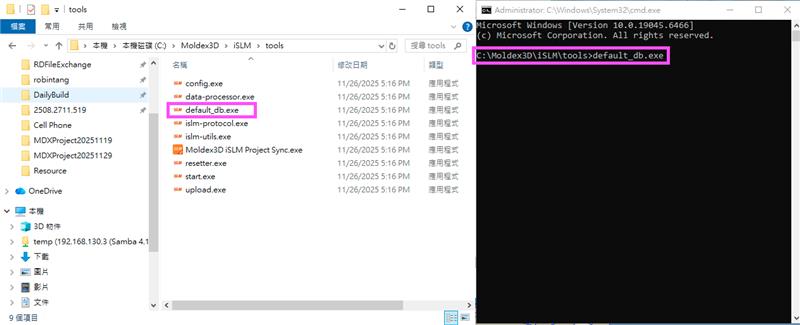
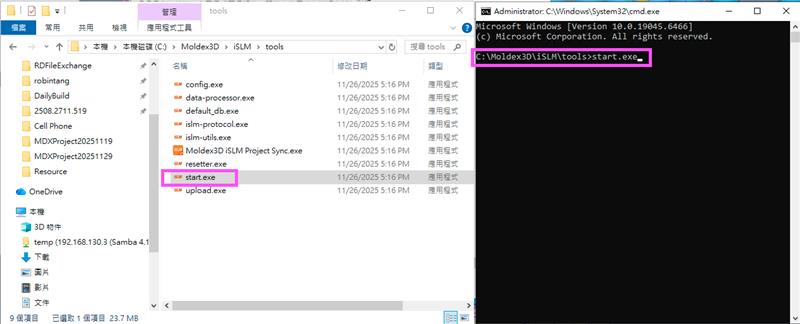
若持續出現這些訊息,請將 DataBase 重新做初始化,操作如下:
- 第一步: 確認 iSLM DataBase Server 是「啟動」狀態,且其他服務為「停止」狀態
- 第二步: 使用 CMD 執行 tools 底下的 default_db.exe 的程式進行初始化
- 第三步: 使用 CMD 執行 tools 底下的 start.exe 的程式
- 第四步: 開啟 iSLM Startup Tool 啟動服務
- 169 views
- 1 answers
- 0 votes
-
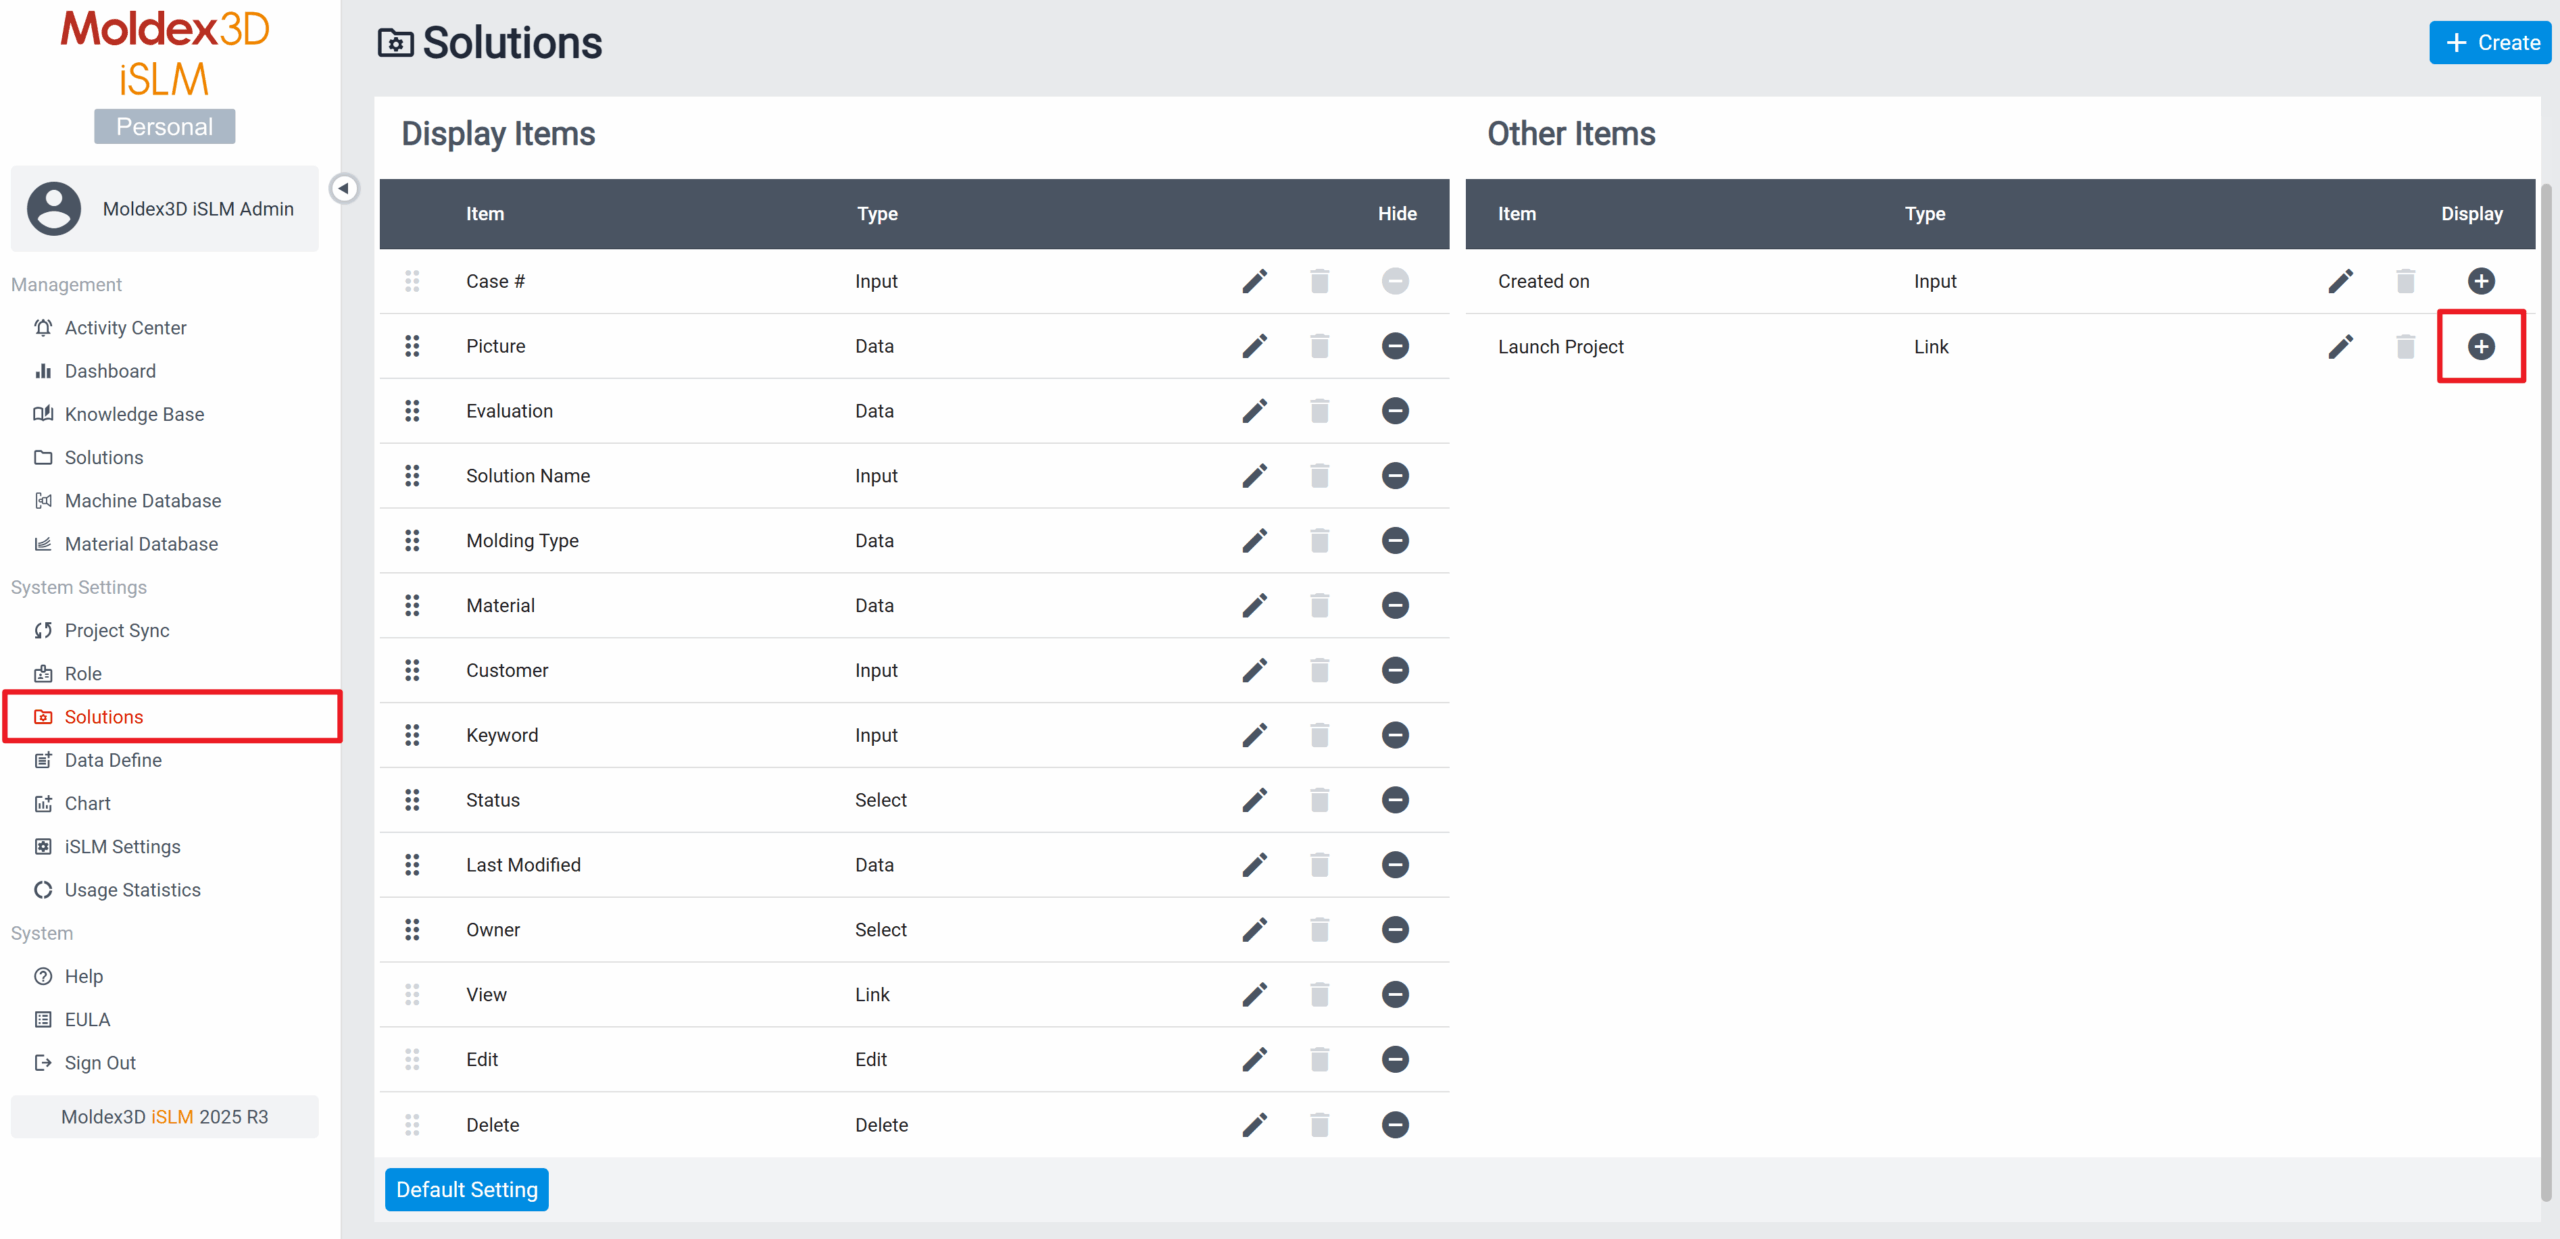
若在升級並安裝 iSLM – Personal Mode 後,發現專案列表中未顯示 Launch Project 按鈕,可能是因為在 System Settings > Solutions 中,該欄位先前已被設定為隱藏,導致升級版本後沿用了原有的設定。
請至 System Settings > Solutions 設定頁面,點擊 Launch Project 欄位的 Display 按鈕,即可將該欄位重新顯示於專案列表中。
This answer accepted by Robin. on 17 11 月, 2025 Earned 0 points.
- 236 views
- 1 answers
- 0 votes


